$119 Frame/Fork build
|
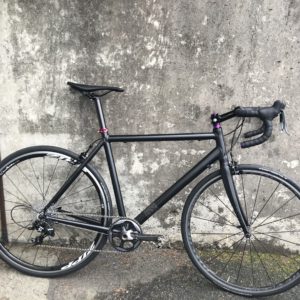
I enjoy building bikes up from parts, and I’ve been frustrated with some newer bike designs that use proprietary parts and standards. While it’s still true that the frame is the most important part of choosing a bike, these days that’s not because of the quality of the frame – it’s mostly because of the design choices that the frame locks you into. When I saw that Wiggle was offering an aluminum road frame and fork for just $119, I thought I’d build one up with inexpensive parts as a winter project. The frame arrived in a few days. It was oversized aluminum painted matte black with minimal branding. The frame weighted 1.72 kg for a size 58 (the largest they offer), which isn’t too bad. It sacrifices about 700 grams (1.5 lbs) to an ultralight carbon fiber frame.
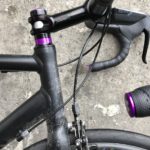
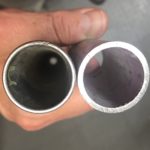
The fork is massive. It’s a carbon fiber fork with an aluminum steerer tube, a good design for a home build. Cutting the steerer and setting the star nut is simpler for an aluminum steerer than for a carbon one, and it’s likely to be reliable. But the aluminum steerer is made from very thick tubing – compare it (right) to a the steerer in a Ritchey fork (left) and you can see how overbuilt the fork is. The fork weighed 660 grams uncut, compared to about 400g for a good carbon fork and 500g for the Ritchey carbon/aluminum. Measuring and cutting the fork wasn’t a problem. I used a Park Tool SG-6 Threadless Saw Guide in a small tabletop vise and a regular hacksaw. I hammered in a conventional star nut for headset tension, which allows me to use customized engraved aluminum top caps. I purchased an inexpensive 1 1/8″ house-brand headset for $15 that was recommended for purchase with the frame. I was pleasantly surprised to find that it installs easily without any hammering or press-fit. I’ll be interested to see how well it stands the test of time, but for $10 (on a $119 frame and fork) I’ll take a chance.
My biggest problem with the frame is that the placement of the rear brake bridge is so high that it’s just barely adequate for the brake shoes to reach the brake track when using normal (technically “short reach”) 39 mm – 49 mm brakes. On the the build! Wiggle’s house brand (cheekily called Brand X) has a lot of very reasonably priced, slightly heavy components for the non-moving parts like bars, stem, and seatpost for under $20. I loaded up on these. I’ve really been loving SRAM’s 1x single ring on the road for its simplicity and smooth operation, so I got the cheapest versions I could find – Apex and Rival parts. The brakes are Apex, as you can see. I had a nice Force crank that I used instead of buying a new crank. I paired a 44 tooth front single ring with an 11×32 in the back to give me gears ranging from 32″ (equivalent to a 39×32 or a 34×28, quite easy) up to 106″ (a bit bigger than a 53×13). I’ve got lots of wheels sitting around so I slapped some on this bike with a sweet Zipp 101 Powertap rear wheel. If you don’t have any spare wheels for your own build, don’t despair. We’re living in the golden age of good quality, affordable factory-build alloy wheels. I’ve had no problems with Shimano’s durable and cheap RS11 (1848 grams), which is widely available for less than $200. Shimano’s even got the RS10 for $100, though I personally haven’t tried that wheelset. The total cost of this bike, using brand-new components, would be around $1000. Weight Performance Graphics and Customization
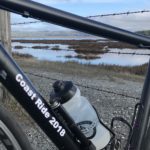
I added a few purple customized aluminum bits from Purely Custom but I’m not sure I’ll keep them. They give the bike a polished appearance but they clash a bit with the otherwise minimal look. All of this may seem like a lot of trouble to go through for a spare winter bike but I enjoy the process. Although high-quality bikes are better than ever, the price of entry for cycling is intimidatingly high and newcomers are left with an impression that they have to spend a lot of money to get a bike that’s adequate. I believe that there is a moral argument for riding inexpensive bikes fast and well. |
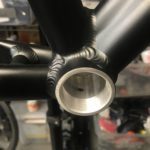 The frame had several nice features – fender eyelets, aluminum reinforced dropouts, replaceable derailleur hanger – and was built around easy to find standards, like a traditional threaded bottom bracket, which helped with assembly. There were a few small quirks. The front derailleur requires a 31.8 mm band, the seatpost is also 31.8 mm which isn’t the most common road size, and the binder clamp is 34.9 mm.
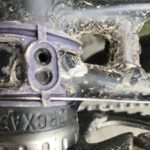 The frame didn’t come with that little plastic derailleur guide for routing the cables under the bottom bracket. Luckily I had a few of these in my parts bin, but I didn’t have the tiny short screw that’s necessary to mount it properly. I used a hot glue gun to mount the guide to the frame. We’ll see how that works.
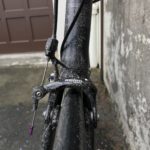 This placement gives the bike loads of clearance for large tires (30 mm tires fit easily) but on some wheels the brake pads might rub on the tire instead of contacting the brake track cleanly. You could always install longer-reach brakes if this became a problem, but they’re a bit of a specialty item these days.